Hi there! And welcome to Craft Goodies. I'm thrilled that you've stopped by and hope you find something here that makes your visit a great one...

Tuesday, May 29, 2012

Guest Posting at the CSI Project!!!

Just a quick note that I'm sharing a Patriotic Project over at The CSI Project today.
It's a project I shared here last year, but love it so much it's making a second appearance!
You'll find all the how-to's by clicking the above link.

And too, we're down to the final three on Season 11 of So You Think You're Crafty.
{I'm a bit amazed I'm still there}

If you haven't cast a vote yet, be sure to jump over and it check out.
This week's theme is Hardware Store Crafts--yes, I was thrilled!!!
Have a great day and happy crafting.
 

SYTYC Week 7...Kids Can Do!!!

Week 7 done and somehow I'm still in this thing! It has been so fun, and I have gotten so many of my "want to makes" finished. This project has turned into one of my favorites. I'm ready to start working on all the goodies to fill it up and make it a really great place for my girls to spend some time...anyone know where to find a cute, pretend cash register?

This theme had me stumped from the time I first saw the list of themes.
But now that I've got it done and behind me, this project is by far one of my favorites.
What started as "hey, I'll make a puppet theater out of this old bookshelf" ended up as a four-in-one play center.


Everything swaps out so easily the kiddos can do it all by themselves! The theater curtains are held in place with velcro so they come off when the show is over and it's time to set up the ice cream shop. The shop name signs are double sided--just give it a flip and you've got a new adventure and the icon signs hang with tied ribbon over a chunky knob. Just add your wares for the day to the dry erase board and your open for business!
As I mentioned, I used an old bookshelf as the base so everything stores neatly on the shelves.


My girls were so excited when they saw it, first thing they did was make a tip jar and plans for the weekend. Ahh, self-motivated entertainment--now that's a "Kid Can Do" success in my book!


Wednesday, May 23, 2012

The How-To's of Making a Hammock Swing!!!

When we were emailed the list of themes for this season "Sunshine" was the one I was crossing my fingers that I'd make it to. It was the only theme that I knew immediately what I wanted to do, so needless to say I am beyond excited that you all liked it too!
This will involve a trip to the hardware and fabric stores so here's what you're after:
*nylon cording
--I used 3 bags of 50 foot 5/16th rope
2 in. diameter wooden dowel
*A Carabiner Hook
**both of these are weight based so think ahead to how
much weight you will have in your swing and buy accordingly!!!
2 yds of Fabric for the swing
1 yd of co-ordinating fabric for the cushions
**I used a heavy Duck Cloth for both that was 45 inches wide
Measure and cut your fabric.


Open up the fabric so you can see the whole piece. Fold it back over itself so you have a piece that measures 45 x 36. To cut the swing piece measure from the cut edge back toward the fold--you're going to need every bit of those extra six inches at the fold!!!
Cut a double layer of the swing fabric to measure 45 inches long by 33 inches wide,with right sides together, set aside for a few minutes.
Use the extra strip of fabric to make the tabs for the side of the swing.
Cut 14 pieces, each measuring 6 inches long by 3 inches tall.
Sew all of the tab pieces.
Fold the fabric in half, right sides together, so you have a piece that is now 6 inches long by 1.5 inches wide. Sew the tab closed along the 6 inch side using a 1/4 inch seam.
**I double sewed all of my seams, if you have a serger just run it through there!
Turn the tab right side out and fold in half matching up the cut ends.
Your piece should now be 3 inches by 1.25 inches.
Sew the ends shut so that you now have a sewn loop/tab.
I made a rectangle at the bottom of each tab and then criss-crossed through the rectangle--these babies aren't coming undone!
Repeat that step 13 more times...

Pin the tabs into place.

Fold up the top layer of fabric along the 45 inch side. Measure up from the bottom one inch and pin a tab into place. Measure up 5 inches from the first tab and pin the second one into place. Measure up another 5 inches from the 2nd tab and add the third tab. Repeat this for the fourth and fifth tabs.
Measure up 6 inches from the fifth tab and pin in place the sixth tab, and then measure up 7 inches to pin the last tab into place.

This is after it's been sewn and flipped, but shows the space between the tabs!
Be sure the sewn edge of the tab lines up with the cut edge of the swing and all tabs point into the center of the swing.
Replace the top layer of fabric, line up all edges, and then carefully remove the pins from the tab and replace them going through all three layers--top, tab, and bottom.
Repeat on the other side of the swing!
Sew the swing.
Leaving the bottom open, sew a 1/4 inch seam along the side, top, and side of the swing. I then used that seam as my guide and ran a second seam another 1/4 of an inch in.
Turn the piece right side out.
Fold the bottom inch in, pin in place, and then iron all the edges flat.
Sew a 1/4 inch seam around the entire piece. Use that seam as your guide and run a second seam around the swing, and then repeat to make a third seam.
Remove the pins from the bottom edge and the base for your swing is done!
Cut and tie the ropes for the swing.
Cut the rope into the following pieces:
swing bottom back: 4 pieces @ 92 inches long
swing bottom middle: 2 pieces @ 88 inches long
swing bottom front: 2 pieces @ 84 inches long
back base: 2 pieces @ 78 inches long
back mid: 2 pieces @ 66 inches long
back top: 2 pieces @ 52 inches long

They tie into the swing tabs in the following order:
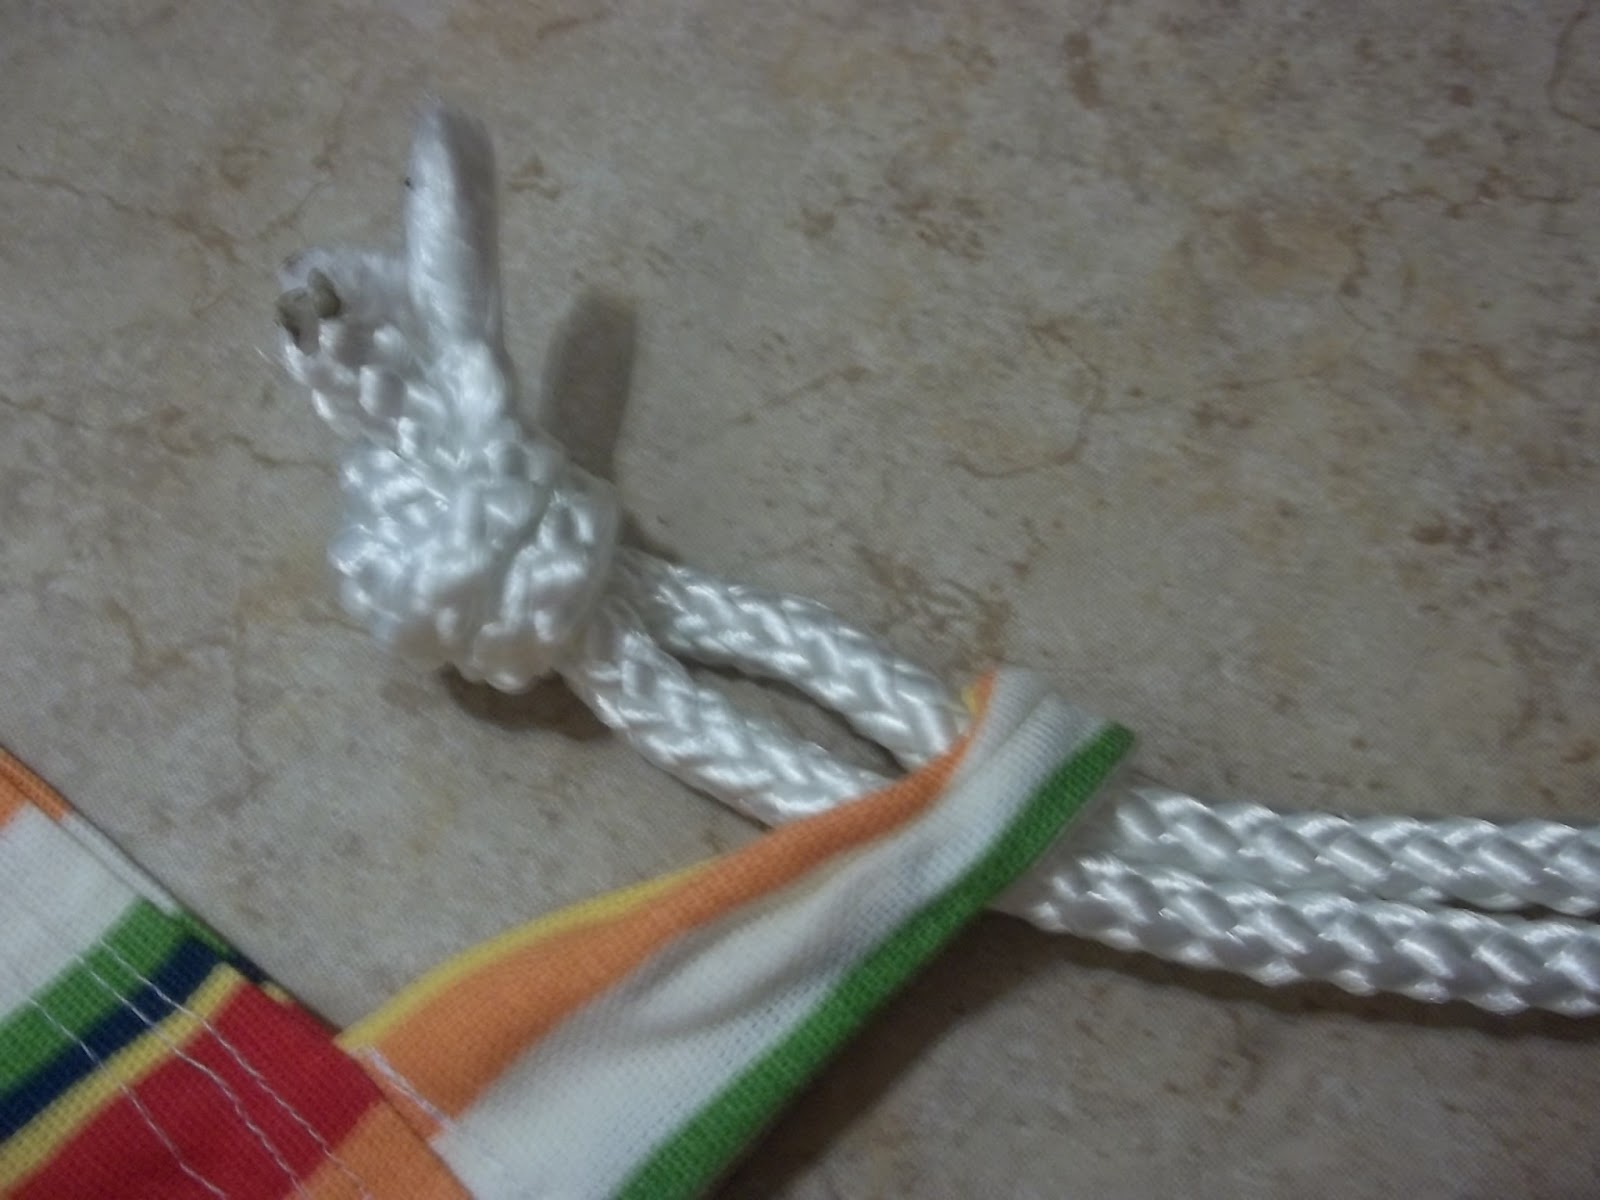
Starting at the bottom, fold one length of rope in half.


 With the ends together, loop them around and through themselves to from a knot at the base of each piece. Use a flame to melt the ends of the rope ends.


Slip the knotted end through the tab on the swing.

Tuck the other end of the rope under the knot, but over the tab and pull until taught.


Push the knot down onto the tab so that the fabric ends up on top of the knot.
Move to the opposite side of the swing and tie that piece into place.
Repeat with each remaining piece of rope until all 14 pieces are knotted onto the tabs.


Add the crossbar.

Measure in on the dowel 7 inches from each end and add a small screw. This will keep the rope from sliding in on the pole.


Add the rope loops onto the pole starting at the top and working your way down. Do this for both sides of the swing.


I had my hubby help with this part as his knot tying skills far surpass mine, but I held the swing up and level while he wrapped a scrap piece of rope around the loops twice and tied it together in an official Boy Scout square knot! I did cut and then burn the ends all by myself though.
**Having a buddy also helps to make sure the swing hangs properly from the pole before you tie it. And then have to
 re-tie it because it's totally lop sided...


Hang the swing.

Cut one last piece of rope 10 feet in length.


 Fold it in half, and then half again so that you are holding one loop and the two tails.
Slide the carabiner onto the folded rope and tie a knot around it, securing it in place.

Yeah, it's different rope, that was the "trial and error" part--not enough nylon rope the first go around!
Separate the two looped ends and tie a knot into each one leaving the loop big enough to slip over the end of the dowel but not too big that it slides right over the gathered ropes already on the crossbar.


I slipped the loop onto the dowel before I pulled the knot tight so that I could adjust it to the dowel.


Sew the cushions.

Last step! Are you ready?
I used an envelope casing for both cushions cause it's quick an easy and makes washing the casings a breeze.
(this is an ehow link if you need a little help with the casing)
The bottom pillow fabric was cut to 45 inches x 21 inches and sewn with 1/2 inch seams at the top and bottom and has a 2.2 in overlap.
The finished size is 21 x 20.
*Just a little fyi, I used the salvage edges so I didn't have to sew seams on the "envelope" part.
The top pillow was cut at 45 inches x 16 inches. Again, sewn with 1/2 inch seams at the top and bottom, has a 3.5 inch overlap and uses the savage egdes as the overlap hem.
Finished size is 20 x 15.


Plop those babies into the swing and smile big because your new sunshine-enjoying swing is done!
 Oh ya! Happy dance time-


Mine is currently hanging from a beam on my patio. We screwed an eye screw into the beam and then slipped the carabiner onto it. Pure happiness!

Thank you so much for letting me share this with you and for all your thrilling votes! I really am just tickled that you liked it.
Enjoy your swing and the summer sun...happy crafting!


Monday, May 21, 2012

SYTYC Week 6...Project SUNSHINE!!!

This little thing won last week!
 I cannot tell you how excited I am--stay tuned for the tutorial...


Oh how I love this theme!
I have been anxiously awaiting it's arrival only to be surrounded by sheer irony...it has rained poured for three days straight. It's left me dreaming of warmer days ahead, relaxing on the patio with a good book in my new, super bright and cheery hammock swing.


Granted, this took a bit longer than I thought it would, a lot of trial and error, and even a bit of "advice" from the hubster but I am thrilled with how it came together.


The colors are so warm and vibrant-just like a warm sunshine filled day. And really what better way to enjoy the sunshine than to be sitting in it?
I cannot wait for this storm to clear out, any guess where you'll find me once it does?

Friday, May 18, 2012

Wood You Like to Craft...May 2012 {Summer Bling!}

**Hey there friends! I was typing up a post for next week and realized I never shared this one--it's been a little crazy around here lately. Anyway, if you didn't get a chance, go check out this month's Wood You Like to Craft projects. With summer quickly approaching the ideas shared are a must!
Enjoy your weekend...

Hi everyone!
 It's Wendy from Craft Goodies here today to wrap up the Summer Bling projects.

My first thought when you mention summer is "HOT" and since we've already hit the 80 + degree mark here in Texas I was drawn to cool comfort, in other words ICE CREAM!


I actually put this together while I was in Utah hanging with my sisters so there aren't any "how-to" pictures...but I can tell you what I did!
I started by drawing my ice cream cone out onto poster board. Then I cut it into separate pieces, the cone, the ice cream, the topping, and the cherry. Everything was traced and cut out of 1/2 inch MDF except the topping  and that was done in 1/4 inch MDF.
From there I painted base coats and then sanded down all the edges.
I used two small pieces of slat wood glued to the back to re-connect the cone and ice cream, stapled on a ribbon loop for a  hanger, and then flipped it over and added the details with puff paint and GLITTER!
Next, glue the choco topping piece into place, add a tulle whip topping poof and the top it with the cherry.
Done!
{Okay, almost done, give the entire piece a good coat of sealer to keep the glitter in place.}


Look! It's mint chocolate chip-
Happy Summer!


Wednesday, May 16, 2012

Teacher Appreciation 2012 Edition!!!

I know this is very after-the-fact. Teacher appreciation was last week, and if you knew the story of my week before I think you'd understand my tardiness in posting. But my hope is you and I can stow these away for next year or even use a few of them as year end gifts.

I love teacher appreciation, I loved it when I was teaching, but I love it even more now that my girls are all in school. They have WONDERFUL teachers that I am so grateful for. So it was with a huge smile on my face and love in my heart I set out to make them each know how much I and my family appreciate all they do.
Monday was flower day...
Teacher Appreciation Gifts
{I was in a super hurry and forgot to take a picture. So thank you pinterest for helping me out here}
I bought a tall cylinder vase and a bunch of pencils (4 dz) at the dollar store.
Hot glued the pencils around the vase, tied a big bow, and add flowers.
The card read:
If we could choose our teacher,
we'd PICK you every time!

Tuesday was a treat day...

A plastic storage container from Wal-mart filled with Swedish Fish! The note read:
It's O-"FISH"-al,
You're Heads and Tails Above the Rest!
Thanks for all you do to keep our little school swimming.

Wednesday was supply day...

Cute, huh? I found a great tutorial HERE.
 I just adapted the supplies to things that our teachers need/use. My cake has notebooks,post-its, dry erase markers, pink pearl erasers, pencils, crayons, and glue sticks.

The card reads:
You've given us "SUPPLIES" to learn to write and read...
But what we really know is we need YOU to succeed!

Thursday was book day...


Floor pillows and a stack of books!
The pillows are covered in envelope casings so they can be easily washed and were machine appliqued with flannel and felt pieces.


The card read:
Chicka Chicka Boom Boom!
A few more books for your room.
Skit Scat Skoodle Doot.
Flip Flop Fee.
Thanks for all the stories that you've read to me!


And Friday was just a memory day...
{and I think my favorite!}


I had the kids each stamp two thumbprints into a book and then sign their names. I went back and drew the shape of an apple around each of the prints. I also had them each tell me why they would give their teacher an apple and then compiled their answers into a little apple shaped book. 
The message on the front of the book is:
Some teachers deserve an apple,
you deserve the whole tree!


Last, I used the name of the school, the school motto, the class and year, the teacher's name, and all the students to make a school family tree. 
The saying on the bottom is:
Like branches on a tree, we all grow in different directions, yet our roots remain as one.
I hand wrote it with sharpie on card stock and placed it into an 8x10 inch frame.


The note on this one said:
Thank you for being the "root" of our school family.

So there you go! One very successful Teacher Appreciation week. It was so much fun to put all this together, and even more so to see the faces of my girls' teachers when they were given to them.

Our year-end gifts are in the works, but I'll share as soon as they are done.
Hope you're having a great week--
happy crafting.

Monday, May 14, 2012

SYTYC Week 5...UPCYCLE!!!

HOORAY!!! I made it through to another week's project. So here you go, my week 5 upcycle...enjoy!


I had a great project in mind--I was going to make over a mirror for my entry way. Hauled the mirror 1400 miles to my dad's house so I could work on it there, went to get it out of the car and STEPPED on  it!!! UGH! But bad became good because I now have this little gem...


A sassy new umbrella for my patio set back at home!
 (And some fun pillows to match.)

So she started out like this:

...so sad, just beige and boring.
But now, with the help of my sewing machine and a few bright and beautiful tableclothes,
I get to enjoy my summer days in bold, colorful style!


Summer...bring it on!
Happy Crafting.


Related Posts Plugin for WordPress, Blogger...