Hi there! And welcome to Craft Goodies. I'm thrilled that you've stopped by and hope you find something here that makes your visit a great one...

Thursday, March 31, 2011

Hoppy Easter Banner...

I have to be honest.
I haven't been a fan of all the banners and bunting floating around of late. That is until I saw one that wasn't pennant shaped! Crazy, I know.
I LOVED that it was more square, does that say something of my personality?
Any way, I decided to give it a go. Here's how it came out...
 
My "Hoppy" Easter Banner:
 

The images are painted on canvas with a ruffle sewn on bottom...


 ...the eggs and end bunnies are just reversed images so you only get close ups of one each!
Might need a little something still, but not to bad for a first try.
I think my opinion of banners has officially been changed!
 
Happy Crafting!


Friday, March 25, 2011

National Craft Month...at Kirstikoo!

I'm clearly not quite back to completely normal-or at least as close as I get.
 I mentioned the Simply Create contest going on over at Kirstikoo Thursday and forgot to share the link.
And well, it's probably a good thing cause I was wrong about the entry deadline.
YOU HAVE UNTIL TOMORROW!!!
Yeah for more time....
 
I'm also feeding a few selfish needs to post my entry...I want to play, there and here:
 

Visit thecsiproject.com


I happily introduce you to what used to be my curtains...


So this was my first time ever attempting pleats, I'm pretty sure it will also be my last!
Those buggers are NOT easy.
Funny thing though, after I got it all done and gave a pleased sigh of relief I pulled out the pleats and liked it even more. (Of course it would go that way!)

But no matter, I got it done and I like it.
And I gave the flower technique shared by Baby Bizzles on Tuesday a try-super easy, love how they came out.

And even better, I got an accidental bonus project out of my pleated efforts...
I measured my pillow wrong and ended up with my pleated (sewn!) fabric being to large.
I cut down to the correct size and ended up with a 3 inch strip of sewn pleats.
No way I was wasting all that effort!


 Now I have a super sassy pillow AND a flirty little headband...sometimes it pays to screw up!
Have a great weekend, I'm off to my first Texas Rodeo...Giddy Up Y'all!
Happy Crafting...

Thursday, March 24, 2011

T.G.I.F.-Thank GOODIES it's Friday #11

Can you believe it's that time of the week again already?
This week has been a blur! And holy cow, it's April next week...
Before we get on to the business of linking, a few of my favorites from last week's party...
{A quick apology to you that linked last week, I had every intention of visiting your links but ended up SUPER sick in bed from Saturday night until Wednesday morning-it wasn't pretty, or fun! But I love you for linking and making this party fun for others, you're all ROCKSTARS in my book!}
 
Does this not just SCREAM Spring?
 I have a thing for tulips-we call our 6 yr old "Tulip" and this is gorgeous...


Would you guess this came from the dollar store?
Ms Not So Perfect shares her secrets HERE
 
And this little guy caught my eye from the moment I saw him..
 
IMG_3130edit
 
 Julie from Inkredible Stamping is a wonder with stamps and digital tutorials.
(this isn't the first one I've admired!) 
She has a fun blog with so many clever ideas.
You can find the info to purchase this bag tutorial HERE
 
And one last favorite...
 
I have no words...just LOVE!
For this project and this blog...Auntie LoLo Crafts
Always such fun, cute, and creative ideas.
Find the tutorial HERE for the button egg and a link to the rabbit pattern!
 
And one quick plug...
Anita and Kelly, the two super fun gals behind Rhinestone Beagle are launching a new weekly linky party!
It will open every Thursday and stay that way until Saturday.
So once you're done here, jump on over there!
Cause can you really get enough linky love? I think not...
 
And on that note, LET'S PARTY!!!
I'm feeling that we are good on the rules-
anything (nice and friendly) goes, up to 4 links.
Grab a button, spread the word and spread the love-visit the links, leave a comment,
that's what makes it fun!
THANKS for taking the time to share.
Craft Goodies
Can't wait to see what you've been up to...


OMTWI Week 3 Project...Standing Floor Mirror!

Visit thecsiproject.com
Week 3 voting has come and gone!
I'll know tomorrow if I've made it through to the finals. This has been so much fun and motivated me to get a ton of things done. My oldest daughter is loving it-the clock and mirror are for her room. Here's my week 3 entry post...
(be sure to read through it to the bottom of this post, I've listed the links to two other fun contests going on)
 
"The hard part of this week's challenge wasn't so much what to do as it was what to finish!
 (I think I have enough stuff in my stash to supply a years worth of this theme.)
It did give great motivation to finish up a project I've had on the books since September...


I seriously LOVE mirrors, and even more, the beautiful standing floor mirrors!!!
 Can't say however, that I can afford one.
The one I drool over from Pottery Barn  is over $600.
So after a good searching of my house, I found everything I needed to give making my own a try...


Some 1x6 boards from a pile in the garage, a few strips of trim molding, hinges meant for another long-forgotten project, 1x2's and a sad little on-the-door mirror purchased on clearance last fall.
I (cautiously) popped off the blue trim from the mirror, cut down the wood, sanded, puttied, re-sanded, stained, and assembled.
And in the end came out with a piece I'm absolutely tickled pink over!


(Pottery Barn eat your heart out)
Thanks for another fun week and for helping to lighten my to-do load!"
 Happy Crafting!

Wednesday, March 23, 2011

What Wendy did Wednesday...

A little Wednesday randomness for you...
 
...today was my preschool day.
We worked on the letter "T" and therefore talked about turtles.
We made "Turtle Soup" (a mixture of a turtles favorite bugs...flies and grub worms! Or cheerios and chocolate chips, much tastier.)
Sang the "Tiny Tim" song more than I can count.
And we made these...
 
If you need a quick kiddo project give this a try.
It was really easy and my pre-k's LOVED it!
 
You need: Styrofoam cups, paint, hot glue, and paper
 
I cut out a turtle body shape from green card stock and added eyes with a marker. Then we shrunk our cups to make a turtle shell. I found the directions for this HERE.
They loved this part-we ended up having our music time in front of the oven so they could watch the "magic" work!
The kids then painted the cups.
Once the cups were dry I glued them onto the paper bodies and we had a whole bunch of cute little turtles.
*If you check the link above you can also find where she used this same technique to create some really cute mini Easter Baskets*
So much fun!
 
I've also been working on the Easter/Spring decor a bit...
 
I made a fun 2x4 butterfly!
Using 2x4 and (get ready to be surprised...) a paint stick!
I swear the guys at Lowe's hide these when they see me coming.
I'm working on an Easter Egg...it is not small. but I do like it so far, I'll share it when it's done.


I tried making my own beaded eggs-not so much a success, the beads wouldn't stick!
Any ideas here?I tried mod podge, spray adhesives, and double stick tape.
I did get it to work with glitter and mod podge and my girls LOVE the sparkly eggs.


I've been working on some egg topiaries. So far I have one covered in little spring flowers and plans to wrap one in sisal rope and the third  in ruffles, I just haven't gotten that far yet!

I've been working on a guest post for Michelle at The Scrap Shoppe, want a peek?
It won't post until later in April, but I'll for sure let you know...


And last, just a few reminders...

The next project for Wood You Like to Craft? has been posted.

Krystal from Sassy Sanctuary is hosting in April. Wanna play along-the supply list is posted HERE but remember the idea is to take it and make it your own! I'm working on mine, I'd love to see what you come up with.

And last, if you've hung in here this far (THANKS!!!) just a reminder that today is the last day to vote for your favorite project at 1 Month 2 Win It! The top 3 will be announced Friday. The projects are really amazing, if you haven't yet, go check them out. And too, thanks for helping to keep me in it this far-it's been a blast!

I'm done, happy crafting!
 

Tuesday, March 22, 2011

Tuesday Treats featuring...Baby Bizzles!

I'm so excited to get to share with you another Craft Goodies friend!
Meet Mindi from Baby Bizzles. She has a super creative mind when it comes to making those little munchkins too cute for words and is going to share one of her secrets with us today...

Hi, this is Mindi from Baby Bizzles. I'm excited to be writing a guest post for Wendy today. I love to craft and sew, mostly specializing in baby accessories. Today I will be doing a tutorial on these adorable silk flower headbands...
I use 100% polyester fabric. Only 1/4 yard will make several flowers. Cut a circle approximately 3 inches across. Cut three more circles, each one a little smaller than the previous circle, with the smallest circle being approximately 1.5 inches across. (as you can see, your circles don't need to be perfect!)

Cut small slits in each circle. I cut 6 slits in the largest circle, 5 in the 2nd, and 4 slits in the two smaller circles.


Take one circle at a time and hold the edge close to a flame. Don't touch the flame, but slowly turn it as you watch the edges curl up a little. Be careful not to hold it too close for too long. If the petal curls down instead of up, just mold it the right way, being careful because the edge will be pretty hot.


Repeat this step on all four circles.


Take your hot glue gun and glue the circles together. Start with gluing the 2nd largest onto the largest. Place several dots of glue or a few small lines. Repeat with 3rd circle and finally the smallest circle. Glue some rhinestones in the center. You could instead hand sew the circles together with a bead or pearl in the center if you prefer.


Glue a small circle of felt or flannel to the back side of your flower. Take a hairclip with another piece of felt or flannel placed in it and glue that on your 1st circle of felt, attaching the hairclip to the flower.


You now have a removable flower hairclip that you can interchange on any headband, or place in the hair when your little girl gets older.


Your beautiful finished product!


Thank you for crafting with me today! And thank you Wendy for letting me share! You can check out variations of this on my website, as well as many other baby accessories, at http://www.blogger.com/www.babybizzles.com


...Fantastic!
I've made a ja-gillion fabric flowers but have yet to try this version. I'm seriously excited to give it a try-
thanks Mindi for a super tutorial.
Happy Crafting!


Monday, March 21, 2011

OWTWI Week 2 Project...Wear Green! and Moving on to Week 3!

Just a little note...somehow, I'm still in this thing!
Wasn't super sure I'd make it to week 3, last week's projects were so good, so if by chance you voted for me, THANK YOU!!!
 If`not, I can't say I blame you, (I didn't even vote for me).
Week 3 projects are up and waiting for your vote. The theme is "Spring Cleaning". We had to create a project from stuff we already had around the house, no money was to be spent on supplies.
(I personally could use about a year's worth of this theme!)
So go check out this week's entries, and here, justfor fun, is my week 2 submission...
 
"What started out as my daughter's need for a " NO PINCHING" shirt erupted into a green fiesta!
You  see we have a small problem at our house, when you make something for one...
you have to make for all.


{That, and I was having a great time, it's been far to long since I've hung out with my sewing machine.}
I started by adding a hand drawn clover applique to a plain white tee and then outlining it with a super ruffled ribbon. I think my girlie is officially clear of the pinching...
 
Skirts came next, I went pattern-less and was super happy with the results. A few more altered tee's, one turned cardi with a snap-close collar and change-able rosette for a spot of color. And the other with a fun emerald green row of layered and rolled fabric flowers.


Then came the shoes...
{I have to tell you, I'm feeling kinda smart about this one! I LOVE it! And best part, my little one is keeping her shoes on because she too LOVES them.}


I bought a pair of white slip-ons and sewed on a snap to the tongue of each shoe. Then whipped up a bunch of ribbon flowers/pom poms in different colors and sewed on the snap back to them.

Ta-Da! Shoes that match EVERY outfit with a simple little snap.
 
This challenge was a ton of fun!
We are happily wearing green at our house."

Friday, March 18, 2011

T.G.I.F.-Thank GOODIES it's Friday #10

Mommy lesson for today...sick kiddos= a very long night!
 
I'm going to get past it by visiting all your fun blogs and seeing all your amazing projects!
Let's PARTY!!!
Last week's party was fantastic, I had a great time checking out all 47 links!!! You gals are awesome and provided some much needed inspiration.
Again, thanks to all that linked, let's do it BIGGER and BETTER.
Here's the weekly reminders:
T.G.I.F.-Thank GOODIES it's Friday!
 I love to see what your brilliant and creative minds are thinking so let's get to the sharing...
Enter up to 4 links...

 tips, ideas, recipes, projects, contests, giveaways, whatever, just share yourself with us!
 Visit others. Leave comments.
PLEASE NO ETSY SHOPS!
{Unless you offer a tutorial with the product} 
Grab a button from below and help spread the "GOOD" word!
Come back again over the weekend and check out the links.
Visit a few, comment a lot!
We all need a little LOVE.
 Link will be open until 11:59pm Monday night. 
**By linking you give me full permission to feature your links, tutorial, photos and blog giving credit back to you of course!
 
Craft Goodies


Thanks for stopping by and for joining the party! It's always more fun when you're here...
Happy Crafting!


Thursday, March 17, 2011

APRIL Word...of the Month Kits are Here!!!

I just have to tell you, it's a good thing Easter is at the end of April otherwise I might have missed it! These designs have been floating around in my head for months. The time to get them drawn out and finished was just hard to come by, better late than never, right?
So without any further delay, here they are...
 
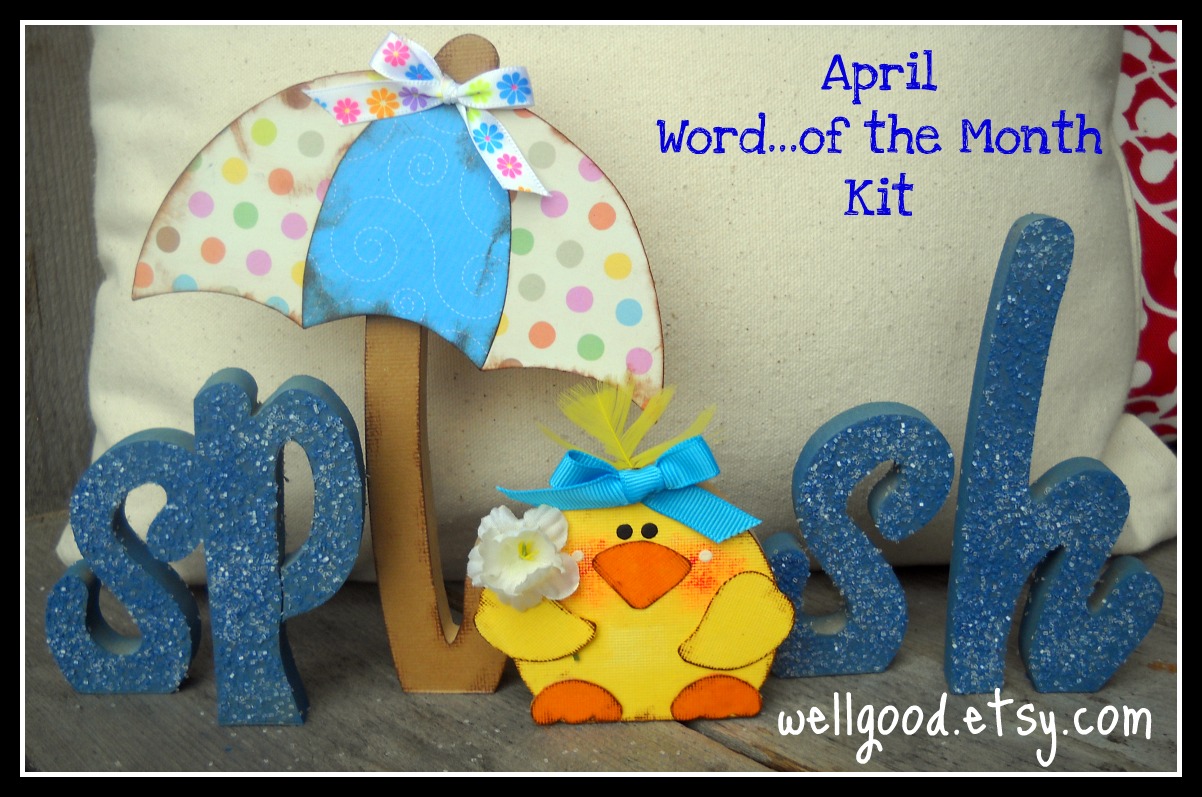
The first word kit comes from my LOVE for a Spring rainstorm.
I love the sound and smell of an April shower... and splashing around in the puddles!


This set is cut from 1/2 inch MDF. The letters are 3 to 5 inches tall, the umbrella stands 7 inches tall, and the little chick is 3 inches tall.
This kit comes unfinished, with all letter pieces (s,p,s,h), L/umbrella handle and top, and chick cutout, paper detail patterns, and finishing instructions. 
Set sells for $7.
***I finished this set by painting the letters and adding glitter.
The umbrella and chick are paper covered, kit includes paper covering instructions.***

I love Spring, and I love Easter. 
I love the colors returning, the flowers blooming , the birds singing,
and a good old Easter egg hunt!


 This Word...of the Month Kit celebrates all of that!
These letters are cut from 1/2 inch MDF and vary from 4 to 8 inches tall.


The kit contains letters E,s,e,r, A/basket cutout, T/rabbit cutout, and heart cutout. 
Paper detail patterns and finishing instructions.
This kit arrives unfinished and sells for $12.

***I finished this set with patterned papers. Paper covering instructions are included with this set.***


I have to tell you, I'm loving these blockheads!
 My goal with these is to keep them fun and easy to reproduce with common found items,
 (and very inexpensive if you need to purchase the kits).
All single blockhead kits sell for $4 each.
I include embellishments where I can, and always include finishing instructions. Plus, you can always find the tutorials here on this site...


What would April be with  out a sweet little spring chick? This kit has you covered!
Kit contains the base 2x4 block (5 inches tall), feet and beak cutouts,
 feathers, eye tacks, and finishing instructions.
Sells for $4.

A tisket, a tasket, who needs an Easter basket?

This kit contains the 2x4 base block, basket topper, rope handle, paper to create the woven front, and finishing instructions.
Sells for $4 each.
***How cute would this be filled with a few decorated eggs, or plastic treat-filled ones? What a fun and cute gift for a friend or teacher!***


And last, celebrate the season with three times the fun!
This set simplifies and combines March and April Blockheads to create a great display piece.


The blocks are staggered in height from 4 to 7 inches tall and all cut from a 2x4.
Detail pieces are cut from 1/4 inch MDF.
Kit contains 3 2x4 base blocks, rabbit ears, nose, and whiskers, chick feet, beak, hair feathers, and wings, and egg.
Finishing instructions are included.
Set sells for $10.
(Can you have Easter and not have a chocolate rabbit? I can't!
He looks super cute white or even gray too...)


As always, you can find these items in my shop or just shoot me an email ( wmgar@comcast.net ) for details.
Group pricing is always available!
You qualify by ordering 5+ sets of any one kit. Again email me for pricing and group shipping rates.

Blockhead tutorials will follow soon...
Happy Crafting!


Related Posts Plugin for WordPress, Blogger...